

Yes, I know. It's January. We all should be dieting, exercising or being otherwise virtuous to purge ourselves of our Christmas sins. But when the weather's this cold and wintry, all I want to do is curl up with some sickly-sweet carbs, and this soft and luscious fudge ticks my boxes. If you're on a diet, cut them small and share them with your friends!
Ginger & honey fudge (from Life is Sweet, by Hope & Greenwood)
Ingredients
450g granulated sugar
150ml runny honey
75g unsalted butter
200ml condensed milk
200ml double cream
5 chunks of stem ginger, finely chopped, plus 2tbsp of the syrup
Method
1. Line a 20cm square baking tin with baking parchment.
2. Put the sugar, honey, butter, condensed milk and cream into a large saucepan. Heat it gently, stirring every now and then with a wooden spoon, until all the butter has melted and the sugar has dissolved.
3. Turn up the heat and put your sugar thermometer into the mixture. Stir every now and then to make sure the mixture doesn't burn. Be careful once it gets to 100c!
4. Keep heating slowly until the mixture reaches 115c. Take the pan off the heat and whisk the mixture using an electric whisk (I did mine in the KitchenAid) for 10 minutes.
5. Add the ginger and syrup. Whisk for 10 more minutes until the fudge looks less glossy
6. Pour into the tin. Cut into rough squares once set. The fudge is quite sticky so I wrapped each square in a twist of greaseproof paper to stop them sticking together.
Sunday, January 10, 2010
Ginger & honey fudge

Tuesday, December 8, 2009
Sprout & pomegranate pilaff
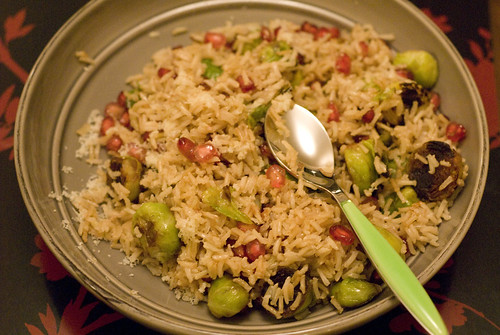
I am not a sprout lover. Over-boiled, cabbagey, dull little bullets are really not my thing, but a bag of them turned up in my vegetable box this week and I was determined to make something tasty with them.
The internet yielded some interesting recipes, all claiming to convert sprout-haters to sprout-o-philes in the blink of an eye. Heidi Swanson's recipe involved both frying and cheese, which seemed like it could be promising. I decided to fry off the sprouts til golden as Heidi does, and then add soy sauce to the hot pan, giving a salty intensity to the earthy veg. I then stirred them through a simple rice pilaff with some pomegranate seeds for juice and colour. A hefty dusting with grated parmesan and I was converted.
Sprout & pomegranate pilaff (serves 1)
Ingredients
12 small sprouts, washed, ends trimmed and any grotty outer leaves removed
1 tbsp olive oil
65ml brown rice, measured in a jug or cup (I like Tilda wholegrain Basmati)
1 tbsp vegetable oil
130ml stock
1 tbsp soy sauce
A handful of pomegranate seeds
Grated parmesan, to taste
Method
1. Halve the sprouts and toss in the olive oil.
2. Heat the vegetable oil in a large saucepan. When hot, add the rice and stir around until you start to hear it pop.
3. Add the stock to the rice. Bring up to a simmer, cover the saucepan with a teatowel and then the lid. Cook for 15mins without opening the lid to peek! If lots of steam is coming out, turn the heat down.
4. Heat a frying pan and when hot, add the oiled sprout halves to the pan, flat side down. Put a lid over the frying pan so that the sprouts steam in their own juices for around 5 minutses.
5. Once the sprouts are steamed, take the lid off the frying pan and stir them around to get some browned crispiness on the rounded sides too. Splash over the soy sauce. Leave to rest in the hot pan until the rice is cooked.
6. Stir the sprouts and pomegranate seeds through the rice. Season and add parmesan.
It also occurred to me that this might be nice with walnuts or toasted pine nuts sprinkled through. Who knew sprouts could be so tasty? Sign me up to Sprout-a-holics Anonymous!
Thursday, December 3, 2009
How to make the perfect meringue
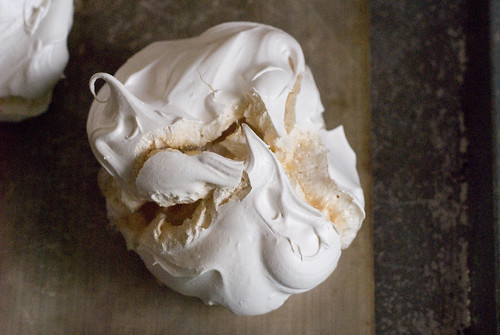
What makes a perfect meringue? In my view, it's a light crispy shell leading to a chewy, teeth-sticking interior. If it can look pretty too, then that's a bonus. Meringues are great for pavlovas, or just to ladle fruit over, and are the perfect way to use up any left over egg whites that you might have hanging around after making custard or mayonnaise from the yolks.
Meringues are not difficult to make and these home made beauties knock spots off those miserable little nests that you get from the supermarket. Here are my top three tips for getting perfect meringues.
1. Weigh your egg whites. Eggs are all different sizes so it's best to go by weight rather than number.
2. Leave the oven door ajar. With electric ovens, moisture can build up inside and stop your meringues from drying out beautifully. Bea (from Bea's of Bloomsbury) says the best way to get a professional finish at home is to wedge your oven door ajar with a wooden spoon.
3. Give it time. The best meringues are cooked long and slow, on a low heat.
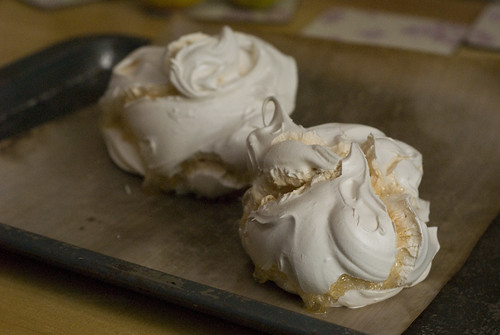
Meringues (makes two large meringues)
I go by the Ottolenghi method of heating the sugar in the oven first. It's easy to scale this recipe up or down as required, just weigh your egg whites and use double the amount of caster sugar. Some people like to add vinegar or cornflour, but I don't find it necessary.
Ingredients
60g egg whites (approx 2 egg whites)
120g caster sugar
1. Preheat the oven to 200c.
2. Line a baking tray with baking parchment and spread the sugar evenly on it.
3. Put the sugar in the oven for 7-8 minutes, until it just starts to melt around the edges.
4. When the sugar is almost ready, put the egg whites into a food mixer and whisk until they start to get frothy.
5. Slowly add the hot sugar to the egg whites. Put the mixer speed to the max and let it whisk until cool. This takes about 10 minutes and when it's ready the mixture should hold stiff peaks. Meanwhile, turn the oven down to 110c.
6. Shape the semi-cooked meringues into large balls on another tray lined with baking parchment. I did this with two large spoons.
7. Pop into the oven for 2 hours.
This is the recipe for a plain meringue, but why stop there? You could swirl in a fruit coulis before baking, roll the meringues in crushed nuts or stir in some rosewater. These meringues will last a couple of days in an airtight container.
Sunday, October 18, 2009
Plum jam with star anise & cinnamon

It's autumn, and with leaves falling from the trees and the nights drawing in I felt compelled to spend a few hours over the stove, stirring something sweet and comforting. Jam is pretty easy to make - in this case you just take equal quantities of plums and sugar, and optionally jazz it up with some spices.
I used about 10 plums and filled two 500g Le Parfait jars, with a bit left over to be eaten that afternoon.
Jam keeps up to two years in a sterilised jar, if you don't know how to do this then read on...
Plum jam with star anise & cinnamon
Ingredients
800g plums, (weight without stones - about 10 plums)
800g caster sugar
2 star anise
1 tsp ground cinnamon
1. Wash, quarter and stone the plums.
2. Toss the plums with the sugar and cinnamon until thoroughly coated. Leave for a couple of hours. This isn't essential but does help to draw out the juices and make the jam quicker to cook. You could always do this the night before and leave them overnight.
3. Preheat the oven to 140C/275F/Gas 1.
4. Put the plum mix into a saucepan with the star anise and heat gently until the sugar has all dissolved. Once this has happened you can bring the jam to the boil.
5. Once the jam has reached setting point, decant into the sterilised jars and close the lids while the jam is still hot. Setting point is at 105°C/220°F, so go by your sugar thermometer if you have one. Alternatively, you can test the jam by putting a drop onto a cold plate and pushing with your finger to see if it wrinkles - if it does, you're done.
Why not try substituting some vanilla seeds or ground cardomom for the cinnamon and anise? Or you could try splitting the plum stones and adding the kernels for an almondy flavour (although I must confess I didn't have much success with the splitting).
Enjoy!
The Princess
Sunday, October 11, 2009
Farewell Floyd!

When James of Back to the Chopping Board and Julia of A Taste of Cherry Pie came up with the idea of a blogging event to honour Keith Floyd, I had to join in.
Keith was an eccentric character who really put the fun into food, and my earliest memories of TV cookery were of him and his frequent "quick slurps" of wine whilst whipping up something homely and delicious.
I decided to adapt this delicious Lapin aux Pruneaux, because a boozy, slow cooked casserole is the sort of dish that really epitomised Floyd.
Lapin aux Pruneaux (Rabbit with prunes) - serves 4
Ingredients
600g diced rabbit
100g ready to eat stoned prunes
4 finely diced shallots
2 cloves crushed garlic
100g diced bacon
1 cup chicken stock
1 cup white wine
1 tbsp tomato puree
Fresh thyme
Oil/butter for frying
Seasoned flour for dusting
1. Lightly flour the rabbit pieces with seasoned flour.
2. Heat some butter and oil in a pan and fry the rabbit until browned on all sides.
3. In another pan, fry the bacon until golden. Add the shallots and garlic, stir and fry gently until softened.
4. Add the prunes and white wine and then allow to simmer.
5. Add the tomato purée and stir in to the bacon, shallots, etc.
6. Add the chicken stock and bring to a simmer.
7. Add the rabbit pieces and thyme and simmer gently for about 40 minutes or until tender. Add water if it starts to get too dry.
8. Season and serve.
Enjoy! And don't forget to have a quick slurp while you're cooking...
The Princess
Sunday, September 20, 2009
Come Dine with Miele
Remember the Miele steam oven, which I raved about back in March after trying it out at their test centre in Oxfordshire? Well, it's now sitting proudly in my kitchen and helping me turn out dish after dish of perfect rice and veges.
In order to test the oven to the max, Miele asked me to host a dinner party. A sort of steamy Come Dine With Me, without the snippy comments and £1000 prize money. I chose our pals Nick and Sal as our victims, Sal having a few food allergies that meant the meal had to be nut-free, meat-free and cheese-free. This was an interesting challenge for me as often when cooking for vegetarians I tend to fall back on the old cheese-on-everything-to-make-it-tasty trick.

We started with an Asian rice salad - simple but zingy, with courgette, fresh herbs, soy, garlic and honey dressing. The rice was of course steamed in the oven, but you could easily boil it instead. The Miele oven proved perfect for the task as I simply set the timer and left it to do its work while I got on with the rest of the preparation.
Next up was a mediterranean vegetable gratin - kind of a ratatouille with extra beans and a crunchy breadcrumb topping. The veg were all to be steamed in the Miele oven and the topping blasted under the grill at the end, but calamity! The dish I had prepared the gratin in was too big for the steam oven. So, I cheated and added some extra wine, put foil on the top and bunged it in my conventional oven. Sorry Miele, I had run out of dishes!

I also made a cheeky dish of potatoes dauphinoise baked in the regular oven for a crispy top.
Finally, several glasses of wine later, we tucked into the piece de resistance - a steamed syrup pudding with clementines and whiskey. This was a big hit - nice and stodgy, with the citrus flavour cutting through the sweet syrupy sauce. Again, I just had to put the dishes in the oven, set the timer and leave it to do its thing, perfect for a dinner party when you want to spend time with your guests rather than being stuck in the kitchen.

So, what do I think of the steam oven? I still love the way it cooks vegetables and rice, but I've also discovered it's very versatile and can reheat meals beautifully without drying them out, sterilise jam jars, prove dough, melt chocolate and even "boil" eggs.
My only gripes are that the door sometimes swings shut when you are trying to get things out and, for my kitchen, it is just a bit too big to have on the worktop. It's not a replacement for a conventional oven, but it's a very useful, and healthy, addition to a foodie kitchen.
Individual Clementine and Syrup Sponge Puddings (makes 6)
Topping
15g butter
6 teaspns golden syrup
1 clementine
Sponge
150g butter
150 g soft light brown sugar
3 eggs, lightly beaten
75g SR flour
75g brioche crumbs
¼ teaspoon cinnamon
Finely grated zest of 1 clementine
75g sultanas
75g dried apricots
1 tbspn whiskey
Sauce
4 tbspns golden syrup
juice of 1 clementine
1. Melt the butter and use to lightly grease the inside of 6 individual pudding tins. Place a teaspoonful of golden syrup in the base of each pudding tin. Thinly slice the clementine into six rounds and put a slice into the base of each tin.
2. To make the sponge; cream together the butter and soft brown sugar until light and fluffy. Gradually beat in the eggs. Gently fold in the flour, brioche crumbs, cinnamon and clementine zest. Finally stir in the sultanas, chopped apricots and whiskey.
3. Divide the mixture equally between the pudding tins and cover each tin with a small piece of foil. Place the tins on to a shallow, perforated steam tray. Cook in the Miele steam oven at 100ºC for 45 minutes. Alternatively, steam them in a pan of simmering water.
4. To make the sauce; place the golden syrup, clementine juice and whiskey in the base of a shallow solid container. Cover the container and place in the steam oven for the last 5 minutes of the cooking time to allow the ingredients to melt together. Alternatively, microwave for a couple of minutes until hot and the ingredients have combined.
5. To serve; turn out the cooked puddings on to a serving dish and drizzle with a little of the sauce. Serve the rest of the sauce separately. I also served this with creme fraiche.
Enjoy!
The Princess
Wednesday, August 19, 2009
Peppers with feta & pesto

This is a super-easy vegetarian dish that could work as a starter or as a main if you served it with a heap of brown rice or cous cous. It's healthy and tasty too, I love the combination of sweet pepper, salty feta and tangy pesto.
Peppers with feta & pesto - serves 4 as a starter
Ingredients
2 red peppers, halved and de-seeded
1 block of feta cheese, cubed
4 tbsps pesto
Instructions
1) Preheat the oven to 180c
2) Divide the feta between the pepper halves
3) Drizzle a tablespoon of pesto into each of the pepper halves
4) Bake for 20 minutes, until the peppers are cooked and juicy
There are heaps of ways you could ring the changes with this recipe - how about using halloumi instead of feta, adding breadcrumbs or cous cous to the filling, or using coriander pesto?
Enjoy!
The Princess
Sunday, June 21, 2009
Tomato & goat's cheese canapes

They may look fiddly, but once you get going these tomato and goat's cheese canapes are pretty simple. I used an icing gun to fill the tomato shells, but you could use a traditional piping bag or just wodge it in with a teaspoon/finger if you're not fussy.
Tomato & goat's cheese canapes
(adapted from In the Mood for Food by Jo Pratt - a fantastic book)
Ingredients
30 cherry tomatoes (go for large ones)
150g soft goat's cheese
2 tbsp double cream
1 tbsp finely chopped chives plus some extra for garnish
1. Slice off the base of each of the tomatoes and scoop out the seeds with a teaspoon. Stand them upside down on a paper towel to dry out.
2. Mix together the cheese, cream and chives. Season.
3. Pipe the cheese mixture into the tomato shells. Garnish with some extra snipped chives. Pop them in the fridge until your guests arrive.
Enjoy!
The Princess
Wednesday, June 3, 2009
Whiskied Butter-Bunny Bobotie

Before anyone starts complaining, this is most definitely NOT a traditional bobotie! Bobotie is a traditional South African dish, a bit like a curried moussaka with a wobbly custard topping. I took my inspiration from the version in Galton Blackiston's new book Summertime.
For my version I used chunks of rabbit rather than minced lamb, apricot jam instead of quince jelly and whiskey instead of brandy. I also added butter beans to the mix and cheese to the custardy topping. It turned out quite well - I hope you'll agree!
Whiskied Butter-Bunny Bobotie - serves 3-4
Ingredients
1 onion, diced
1 fat clove of garlic, minced
400g diced rabbit
1 tbsp curry paste
3 tbsp tomato puree
1 tbsp apricot jam
2 tbsp raisins, soaked for a couple of hours in 2 tbsp whiskey
2 tbsp toasted flaked almonds
2 eggs
Pinch of grated nutmeg
200ml double cream
50g mature cheddar, finely grated
1. Preheat the oven to 180c. Heat your frying pan and fry the onions and garlic in some oil until they are soft and just starting to brown.
2. Add the rabbit. Keep stirring until it is coloured all over.
3. Stir in the tomato puree, curry paste and apricot jam. Cook for 15 mins.
4. Stir in the soaked raisins (keep the whiskey!) and almonds. Transfer the mixture to an oven dish and let it cool.
5. Now for the custard topping. Whisk together eggs, nutmeg and seasoning. Stir in the cream, the grated cheese and the whiskey from the raisins.
6. Pour the custard mixture over the lamb and then pop into the oven for 40 minutes.
Enjoy!
The Princess
Sunday, May 24, 2009
Pig cheeks in cider

Thanks to a tweet from Niamh at Eat Like a Girl, I discovered that Waitrose are now selling pig cheeks amongst other "forgotten cuts" of meat. And a bargain they are too, with 300g setting me back just over a quid. They're best cooked slow and long, braised in wine or in my case, cider.
Pig cheeks in cider (serves 2)
Ingredients
4 - 6 pig cheeks
Large knob of butter
500ml cider
1 onion, diced
4 cloves garlic, crushed
1 tbsp herbes de provence
1 savoy cabbage, shredded
1) Preheat the oven to 160c.
2) Heat a pan, get the butter foaming and then brown the pig cheeks all over. Remove and put into a casserole dish.
3) In the same pan, cook the onion until soft, then add the garlic and herbes de provence. Cook until the garlic is just starting to colour (add more butter if necessary).
4) Pour the cider into the pan and gently scrape the bottom to get all the yummy porky bits off.
5) Add the cider mixture to the casserole.
6) Bung it in the oven for 1 and a half hours.
7) Throw the cabbage in for the last 10 minutes so that it wilts down into the cidery juices.
I served this up with a heap of lentils, a bit wintry perhaps but definitely an earthy and satisfying meal. It would probably be even nicer with a few slices of Bramley apple thrown in, but I didn't think of that until afterwards!
Saturday, March 21, 2009
St Patrick's Day cooking with Miele

Last Tuesday a lucky group of food bloggers was treated to a day in Miele's Experience Centre, to cook some St Patrick's Day fare and test out the technology. I travelled down to Oxfordshire along with Joanna of Joanna's Food, Joy of Almanzo's Belly, Sam of Antics of a Cycling Cook, and my namesake Alex from Just Cook It.
The theme of the day was, of course, Irish recipes. After some coffee and pastries, we split into four teams and got cracking on the cooking, with the chance to play with some of Miele's toys at the same time.
I tried out the integrated steam oven and the Tepan-Yaki hotplate. Steaming rhubarb to make a Roscommon Pudding meant that the fruit really kept its colour and shape. We also made a really simple leek and watercress soup and I was surprised to find that it didn't need any seasoning. Steaming the vegetables kept the flavours fresh and vibrant. It's a very healthy way of cooking too.
The Tepan hotplate was lots of fun. If you haven't seen one before, it's a flat, smooth hob that lets you cook directly on the surface, Japanese style. It took a while to heat up, but once it was searing we grilled some prawns on it with the minimum of oil. You could just as easily use it for a full English (or should that be Irish?) breakfast.
After a few hours of toil in the kitchen we had the chance to taste our just desserts. It was quite a spread, with soda bread, beef in Guinness and Roscommon rhubarb pudding amongst the dishes on the table.
We were then shown around the centre to learn more about Miele. The technology was innovative to say the least. I was particularly keen on the dishwasher that opens its own door when it has finished (no more nasty water marks on my glasses!), the fridge that keeps a cabbage fresh for 6 whole months, and the wireless meat probe that lets you cook your meat to medium-rare perfection.
The Miele Experience Centre isn't just for food bloggers either; Miele run regular Let's Do Lunch events to help prospective purchasers test out the products. So if you're thinking of decking your kitchen out with some top end gadgetry (can I come and live with you?), why not try it out first?
My favourite dish of the day was this Bailey's chocolate cheesecake. It's too good to eat just one day a year, and although it takes a little bit of effort it can easily be made ahead and is very impressive.
Bailey's Chocolate Cheesecake
Ingredients
For the base:
150g digestive biscuits
110g butter
3 tbsps cocoa powder
2 tbsps caster sugar
For the filling:
300g cream cheese
120ml double cream
1 egg
75g icing sugar
120g plain chocolate chips
4tbsps Baileys liqueur (plus extra if you like a tipple whilst you're baking)
For the topping:
75g plain chocolate
2 tbsps golden syrup
30g butter
1) Preheat the oven to 150c
2) First make the base. Crush the digestive biscuits. Melt the butter in a saucepan or the microwave. Mix the melted butter into the crushed biscuits, cocoa and sugar. Press the mixture into the base of a 22cm springform tin.
2) Bake the base for 15 minutes. Remove and let cool. Leave the oven on as you'll be using it again later.
3) Now for the filling. Beat together the cream cheese, cream, egg and icing sugar until smooth. Stir in the chocolate chips and slug of Baileys.
4) Pour the mixture over the base and return the tin to the oven for 35 minutes or until the filling is just set. We used the Miele oven's Moisture Plus setting, which injects an automatic burst of steam to keep the cheesecake moist and lovely. If you're not lucky enough to have one of these then just bake it at 150c. If you're feeling brave then you could try using a bain marie, but my Leith's Bible doesn't seem to think it's necessary so I didn't bother.
5) Cool the cheesecake in the tin and then pop it in the fridge overnight.
6) Finally, you need to make the chocolate topping. Break the chocolate into small pieces and put it into a small saucepan with the golden syrup and butter. Gently melt the ingredients together. Give it a stir and then pour the topping over the cheesecake. Chill again to set the topping.
Enjoy!
The Princess
Monday, February 9, 2009
Make your own pomegranate molasses

If, like me, you've been drooling over Helen's Pomegranate Duck with Caramelised Pears, then you'll need to get your hands on some pomegranate molasses. I trawled all my local supermarkets for this middle eastern ingredient, but my searching was in vain. Unfortunately Surrey doesn't seem to be quite cosmopolitan enough to stock such delicacies. However, a few minutes of internet research yielded a surprisingly easy recipe, so I thought I would have a go at making my own.
Pomegranates have been around since ancient times, and supposedly it was the temptation of sucking the seeds of one of these bejewelled lovelies that trapped Persephone in the underworld. They have featured in the Bible, the Torah and in Romeo and Juliet; Nigella Lawson has been known to swoon over their ruby-like beauty and AA Gill has been known to eat the seeds with a safety pin.
Pomegranate molasses is a great marinade for duck or lamb (try this recipe by Sophie Grigson), it is sticky, rich, sweet and sour. It features heavily in the Moro cookbook, which comes highly recommended by me.
So, without further ado, here is the recipe for pomegranate molasses.
Pomegranate molasses
Ingredients
500ml pomegranate juice (widely available - I used Pom)
75ml lime juice (or lemon juice, which is more traditional)
100g golden caster sugar
1. Add the ingredients to a saucepan, stir and bring to the boil.
2. Simmer until reduced by two thirds
3. Transfer to a container and cool. The molasses will thicken further as it cools.
I used two tablespoons of pomegranate molasses as a sauce for duck, bubbled up with the duck juices and a pinch of cinnamon. I then froze the rest in an ice cube tray, ready for future pomegranate emergencies.
Enjoy!
The Princess
Thursday, January 15, 2009
Thai duck and green bean curry

Duck has to be one of my favourite meats, it's rich, dark, moist and tasty. According to Saint McGee, this richness is down to the the duck's abundant "myoglobin-rich" muscle fibres, a necessity when you need to fly hundreds of miles on the trot. It certainly puts the lazy old chicken to shame.
When out on the town, I can be almost guaranteed to choose duck confit if available, and I really miss the mouth-wateringly crispy Peking Duck that I ate on a regular basis in Hong Kong. However, it's January, and that means not only joining the gym, but replacing crispy skin with veggies and hot, fragrant, metabolism-boosting spiciness.
I adapted this recipe from one I found on the Good Food website. It's one of those slow-cooking, go-and-watch-the-TV-whilst-it-cooks type recipes. It's a new staple of mine and regularly crops up as weekday comfort food.
Thai duck and green bean curry - serves 2
Ingredients
2 duck breasts, without skin
3 tbsp green Thai curry paste
1 tbsp palm sugar (or brown sugar, if you don't have it)
400ml can coconut milk
1 tbsp fish sauce
Juice of 1 lime
3 kaffir lime leaves, shredded
100g (1/2 bag) green beans, trimmed and chopped in half
350g bag of fresh bean sprouts
1 red chilli, chopped finely
A handful of chopped fresh coriander, to garnish
1. Fry the duck breasts until they are browned and most of the fat has rendered off. Make sure you use a saute pan or saucepan as it will need to be deep enough to take the liquid ingredients later. Remove to the chopping board and let cool slightly. I usually pour the rendered fat into a jar and save it for other cooking purposes. Like goose fat, it's great for roasties!
2. In the meantime, fry the curry paste and sugar for 1-2 mins in the same pan.
3. Add the coconut milk, fish sauce, lime juice and lime leaves. Bring to a simmer.
4. Slice the duck breasts into bite size pieces, then add to the simmering coconut milk mixture.
5. Cover the pan and simmer gently for 1 hour.
6. Add the green beans and cook for 10 more minutes. Season with fish sauce and/or palm sugar as necessary.
7. Stir through the bean sprouts and chilli. Cook for 2 more minutes, then serve with shredded coriander and a big heap of steaming jasmine rice.
And now I'm off to the gym to see if I can improve my abundance of myoglobin-rich red muscle fibres. I think I'm more of a chicken though!
The Princess
Wednesday, November 26, 2008
Sugar crusted salmon recipe

It may not look like much, but I really love this strange fusion rub for salmon, courtesy of Nigella's How To Eat, who in turn took it from Neil Stuart's Pacifica Blue Plates.
Nigella adapted Neil's original recipe to remove the cocoa, but I put it back in and loved the outcome. It's sweet, spicy and hot all at the same time, and super-quick so perfect for after a hard day in the office.
Sugar spiced salmon - serves 1
Ingredients
1 fillet of salmon, skin on or off depending on your preference
1/4 tsp ground ginger
1/4 tsp ground cinnamon
1/4 tsp ground cumin
1/4 tsp cayenne
1/4 tsp caster sugar
1/4 tsp salt
1/4 tsp mustard powder
1/4 tsp cocoa
1. Heat a griddle or non-stick frying pan until hot
2. Mix all the dry ingredients in a bowl, then dust the salmon all over with the sugar-spice mixture
3. Pop the salmon into the frying pan until cooked through. Mine took about 5 minutes per side, but use your judgement as the timing will differ depending on the thickness of the fillet.
I ate this on a bed of soy-soaked sugar snap peas (the salmon that is, not me!).
Enjoy!
The Princess
Sunday, November 16, 2008
Macaron class at L'Atelier des Chefs
We split into four teams, each of which was assigned a different flavour of macaron. My team was tasked with the Foie Gras & Porto variety, a sophisticated flavour combination in chic cement-grey. Another first for me was de-veining the foie gras, a messy job but very satisfying. Rather like walking barefoot in mud and letting it squidge between your toes, we plunged our fingers into the foie, squeezed and pulled it apart, ripping out the veins wherever we found them (much to the revulsion of our vegan videographer!). We then simply whizzed this up in the machine with some porto, butter and cream to make a super-rich and luxurious filling. We then moved on to the basic recipe for the outer macaron shells, which was identical for all the teams save for the different lurid food colourings. Basic Macaron recipe 350g icing sugar 250g ground almonds 215g egg whites 150g caster sugar 1) Preheat the oven to 160c. Whisk up the egg whites with a pinch of salt, add the caster sugar and beat until you have a stiff and glossy meringue mixture. Add food colouring of your choice. 2) Sift the almonds and icing sugar through a chinoise to get a fine powder. 3) Mix the dry ingredients with the meringue mixture throroughly. There's none of the usual gentle folding, in fact you're intentionally knocking the air back out of the meringue mixture. We used a plastic spatula to cut and fold the mixture until it was smooth and shiny. It is ready when a cut in the mixture absorbs back in 9-12 seconds. 4) Use a piping bag to pipe macarons onto a greaseproof paper lined baking tray. The trick is to let the tip of the piping bag rest on the greaseproof paper at a 45 degree angle and increase the pressure without moving the bag. This makes the macaroons perfectly circular. 5) To get the air bubbles out of the macarons (and therefore stop them cracking open in the oven), drop the trays onto the worktop hard! 6) Let the macarons dry for 15 minutes at room temperature. They are ready to cook when they are just "touch dry". 7) Cook for about 15-20 minutes in the oven. 8) Leave to cool on the tray, then sandwich together with your choice of filling. It is really up to you and your imagination as to what to fill your macarons with. Some great filling ideas from around the blogosphere can be found. How about chocolate ganache, passion fruit or cardomom, wattle seed and orange? Even Nutella would go down a treat I'm sure. After almost two hours of slaving in the kitchen, we finally got our just desserts (literally). The foie gras teamed perfectly with the sweet, crunchy and slightly gooey macaron casings, rather as it does with a sticky dessert wine. I also adored the golden-brown salt caramel variety. The raspberry & rosewater were subtle and fragrant, belying their razzle-dazzle-red exterior, and the lime & ginger were zingy and refreshing in a zippy green. After trying one of each flavour, we picked up our doggie bags (haggling/bargaining/fighting for our favourite flavours where necessary) and tottered on our sugar-fuelled way. L'Atelier des Chefs was the perfect place to pick up a tricky new skill in a relaxed atmosphere. Of course if you're not willing or able to go to all that trouble you can pick up a few macarons from Laduree. However, all that labour comes at a price. And you wouldn't have half as much fun… The Princess
Not to be confused with coconut macaroons…macarons are a sugary French delicacy, think little domed, almondy meringue biscuits sandwiched together with something sticky and decadent. They are a treat I'd tried in Parisian cafés but never been brave enough to bake before. However with some encouragement from Niamh of Trusted Places, moral support from a whole host of fellow food bloggers (Lizzie, Su-Lin, Krista, Josh, Alice, Helen, Jonathan, Abi, Kang, Tom, Bron, Mark, Mia and Shuna) and expert instruction from our teacher Baldwin, on Saturday the impossible became possible. 


Monday, October 20, 2008
Chocolate peanut fudge

It was officially Chocolate Week last week, so to celebrate I made a batch of this easy chocolate and peanut "fudge". It's very addictive and I ended up feeding it to my colleagues to stop myself eating the whole box!
Chocolate and Peanut Fudge
Ingredients
200g smooth peanut butter
250g dark chocolate, broken into small pieces (or buy chips)
Two large handfulls of marshmallows
1 tsp vanilla extract
1 can condensed milk
1. Grease and line a 9 x 9 inch baking tin.
2. Mix together the chocolate pieces, marshmallows and condensed milk in a large saucepan. Melt to a smooth, gooey mixture over a low to medium heat - keep stirring and be careful not to burn the chocolate.
3. Take the pan off the heat and stir in the vanilla and peanut butter until everything is well combined.
4. Spoon the mixture into the lined tin and spread with a palette knife so the mixture covers the tin evenly.
5. Once the mixture has cooled to room temperature, pop it into the fridge for at least an hour before cutting it into squares.
This will last 10 days in the fridge....if you let it!
Enjoy!
The Princess
Saturday, September 20, 2008
Trotter Gear - an adventure

Ever since I saw Fergus Henderson demoing it at Covent Garden night market, I have wanted to have a go at making Trotter Gear. It's a simple recipe, just a traditional stew with trotters in, shredded, strained and cooled into a wobbly, gelatinous block of loveliness. It can then be used as an ingredient to intensify any slow cooked stew or casserole - if you're in need of inspiration, take a look at the St John website or, better still, buy Fergus's book Nose to Tail Eating.
My first challenge was to find some trotters, but luckily my local butcher Robert & Edwards was happy to oblige (much to the shock of my fellow customers). I also invested in some Bic razors as, according to Fergus (and I can confirm it is true), trotters can be a bit bristly between the toes!
This is my own take on the recipe, based on the ingredients that I had around but reasonably faithful to the original. If you want the real thing then do buy the book (I strongly recommend it), or if you're feeling lazy you can buy Trotter Gear from Selfridges and various other locations.
Ingredients
2 trotters, shaved of any hairy bits (hence the Bic razors!)
A few onions (I used three shallots and a red onion), halved, skins on
1 carrot, split in half
1 leek, split in half
1 stick of celery
1/2 a head of garlic, cut horizontally
1 bottle of white wine
Vegetable stock
A couple of bay leaves
A bouquet garni, or some sprigs of thyme and sage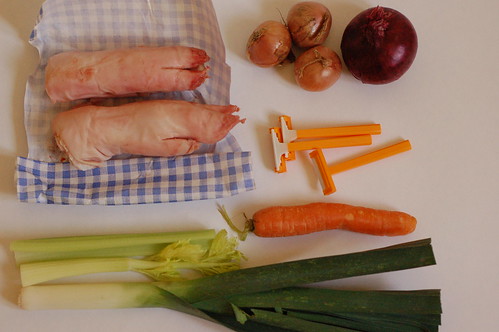
1. Preheat the oven to 150c / 300F
2. Put the trotters into a large saucepan and cover with water. Bring to the boil for five minutes or so, until lots of horrible scum comes to the surface. Scoop off the scum, lift the trotters out into a large roasting tin and discard the water.
3. Tuck the vegetables and herbs around the trotters, then pour over the wine. Add stock to cover everything, and grind over a liberal helping of black pepper. If you prefer, you can use less wine and more stock.
4. Put the tin into the oven and let it bubble away slowly for at least three hours, and up to five.
5. Drain off the cooking liquor through a sieve and set aside.
6. Remove the trotters to a bowl and shred off the meat, fat and skin using a couple of forks. Put the shredded meat into a container - perhaps a parfait jar, or I used a loaf tin lined with clingfilm. Top up with the cooking liquor. Compost the left over veges.
7. Let the Trotter Gear cool. It can then be stored in the fridge for a week or so, or you could do as I did and split it up into convenient sizes and pop into the freezer. Mine was a bit more wobbly than Fergus's and not quite as photogenic!
I will be trying out some recipes using Trotter Gear as an ingredient very soon...in the meantime I am off on holiday for a week or so, learning to make chocolate wedding cakes. I'm sure the results will either be on here or on Cake Wrecks in the coming weeks!
Enjoy!
The Princess
Sunday, September 7, 2008
Moist plum cake with vanilla ripple
 It's been a horrible, wet weekend in Surrey so there was only one thing to do - stay in and bake! I found this recipe on one of those free cards you get in the supermarket. I substituted yellow plums, although you could easily use the red variety, greengages or various other fruit (raspberries might go nicely).
Moist Plum Cake with Vanilla Ripple - makes 10 large pieces
400g plums, chopped roughly
200g self raising flour
175g unsalted butter
175g dark muscovado sugar
3 tbsp caster sugar
4 eggs
1 tsp vanilla extract
200g cream cheese
1. Preheat the oven to 180c (gas 4). Grease and line a shallow baking tray with baking parchment. The parchment must come up above the sides of the tin to contain all the mixture.
2. In a bowl, beat the cream cheese with a wooden spoon until soft. Add the vanilla extract, caster sugar, one egg and beat until smooth. Mine separated slightly but it didn't seem to affect the end result.
3. In the KitchenAid, beat the butter, 3 remaining eggs, muscovado sugar and flour for a couple of minutes until creamy and pale brown.
4. Spread the creamed muscovado mixture into the lined pan. Swirl the cream cheese mixture on top and then sprinkle with the chopped plums.
5. Bake for 45 minutes until the cake is slightly firm and springy to the touch. Leave to cool in the tin.
The cake tastes great served hot or cold. It should be deliciously moist, with the creamy swirls of sweet cream cheese providing an instant-custard effect. Or you could just serve it with more custard...
Enjoy!
The Princess
Sunday, August 31, 2008
Pea, broad bean and goat's cheese salad

It was rainy all day today (with a bit of thunder and lightning thrown in) so I skipped the Chilli Crab Festival in Brick Lane and stayed in for an indoor photo session instead. And, once I'd podded the peas I had to make something tasty with them so here is the result...
I have to admit to being terribly unhealthy and only really enjoying a salad if it contains bacon, cheese or chicken! This warm "salad" hits the jackpot with two out of three of my faves, plus delicious broad beans and peas which are both in season at the moment.
Pea, broad bean and goat's cheese salad
A couple of handfuls of freshly podded peas per person
A couple of handfuls of broad beans per person
1 round goat's cheese, cut into small pieces
10 cherry tomatoes, halved
100g Chorizo
1. Cook the broad beans and peas in some boiling water for a few minutes until tender.
2. Meanwhile, skin the chorizo, cut into chunks and fry in a dry pan until it's nicely golden brown on the outside and the vibrant red oils have been released.
3. Drain the beans and peas, and toss all the ingredients together. The cheese will start to go gorgeously gooey on contact with the hot ingredients.
4. Season to taste and serve, I just stuck to pepper because there was plenty of salt in the chorizo and cheese. Enjoy!
The Princess
Tuesday, August 26, 2008
What is....amchur?
 It looks like sand and it tastes like...something fruity, sour and zingy. Sometimes substituted by lemon or lime juice, or even tamarind, amchur (or amchoor) is an ingredient made from dried mangoes and gives a delicious cheek-sucking tartness to North Indian curries and other dishes.
Inspired by The Second Pancake's Chana Masala, I dashed out to buy some amchur from Delhi India to top off this delicious curry. However, I ended up testing it out in a simple marinade instead.
Zingy Amchur Prawns (serves one greedy girl)
200g raw tiger prawns
1 tsp Maldon salt
1 tsp amchur
Pinch of chilli flakes
1 tsp ground pepper
1 tbsp olive oil
1. Mix all the ingredients together
2. Fry the prawns in a griddle pan until pink and juicy (approx 2 mins each side)
3. Toss with some ripped up coriander leaves Enjoy!
The Princess

