Saturday, September 27, 2008

Chocolate wedding cakes at the Barry Callebaut Academy

White chocolate wedding cake

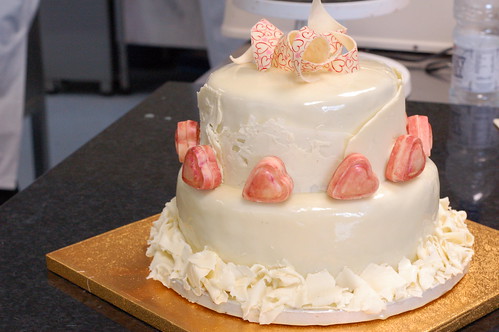
I have been slaving away for three days this week on a Professional Chocolate Wedding Cakes course at the Barry Callebaut Academy in Banbury, Oxfordshire (courtesy of Squires Kitchen School). My classmates and I were ably instructed by the Academy's lovely UK head, Beverley Dunkley, who took us from complete novices on Monday morning to the proud parents of some very respectable two-tier chocolate wedding cakes by Wednesday evening. We baked, melted, tempered, curled, twirled, moulded, ruffled and primped our way to chocolatey perfection, and absorbed a good dollop of interesting theory along the way.

Day 1 was a pre-course and covered the basics of the history of chocolate, different cake and filling recipes, syrups and ganaches. We faced the arduous task of tasting seven different cake formulations, talked about shelf lives and alcohol syrups and baked our chocolate sponges.

On day 2 we were joined by some more experienced classmates and began to practice tempering the chocolate, plus fill and cover our cakes in ganache and sugarpaste. The trickiest part by far was tempering the chocolate, this is the process by which you get chocolate with a lovely shiny surface, that great “snap” and a silky mouthfeel. The basic idea is that by manipulating the temperature of the chocolate, the crystalline form is stabilised and the chocolate made ready to use. I think it's a case of practice makes perfect and I will be persevering some more until I get a feel for what is right and don't have to rely on a thermometer anymore...


Cocoform rose and chocolate butterflies

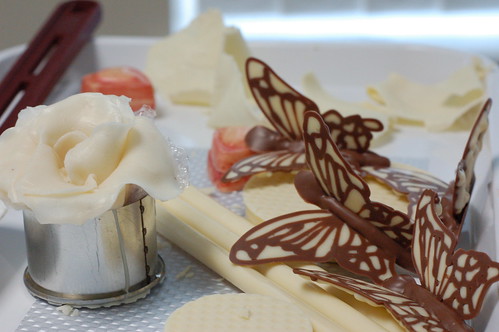
Finally, on day 3 we coated our covered cakes in chocolate glaze and produced all manner of fantastic decorations to finish off our designs. Particular highlights for me were the modelling paste roses and chocolate butterflies, which were surprisingly easy and very effective. Forming chocolate on a frozen granite slab a la the Hairy Bakers was also great fun.

Our class was a great mix, from those who had been decorating cakes for years and professional caterers to keen novices like me, and I was very impressed with what we came up with in the end.

The techniques could be easily used on birthday cakes or others, and the course was intensive (I even got a blister!) but great fun. I will definitely be putting what I've learnt to practice very soon.

Watch this space!

The Princess

Saturday, September 20, 2008

Trotter Gear - an adventure

Fergus Henderson gesticulating about trotters!


Ever since I saw Fergus Henderson demoing it at Covent Garden night market, I have wanted to have a go at making Trotter Gear. It's a simple recipe, just a traditional stew with trotters in, shredded, strained and cooled into a wobbly, gelatinous block of loveliness. It can then be used as an ingredient to intensify any slow cooked stew or casserole - if you're in need of inspiration, take a look at the St John website or, better still, buy Fergus's book Nose to Tail Eating.

My first challenge was to find some trotters, but luckily my local butcher Robert & Edwards was happy to oblige (much to the shock of my fellow customers). I also invested in some Bic razors as, according to Fergus (and I can confirm it is true), trotters can be a bit bristly between the toes!

Trotters


This is my own take on the recipe, based on the ingredients that I had around but reasonably faithful to the original. If you want the real thing then do buy the book (I strongly recommend it), or if you're feeling lazy you can buy Trotter Gear from Selfridges and various other locations.

Ingredients

2 trotters, shaved of any hairy bits (hence the Bic razors!)
A few onions (I used three shallots and a red onion), halved, skins on
1 carrot, split in half
1 leek, split in half
1 stick of celery
1/2 a head of garlic, cut horizontally
1 bottle of white wine
Vegetable stock
A couple of bay leaves
A bouquet garni, or some sprigs of thyme and sage

Ingredients for Trotter Gear

1. Preheat the oven to 150c / 300F

2. Put the trotters into a large saucepan and cover with water. Bring to the boil for five minutes or so, until lots of horrible scum comes to the surface. Scoop off the scum, lift the trotters out into a large roasting tin and discard the water.

Trotter scum!

3. Tuck the vegetables and herbs around the trotters, then pour over the wine. Add stock to cover everything, and grind over a liberal helping of black pepper. If you prefer, you can use less wine and more stock.

Trotter gear ready to be cooked into unctuous potential

4. Put the tin into the oven and let it bubble away slowly for at least three hours, and up to five.

5. Drain off the cooking liquor through a sieve and set aside.

6. Remove the trotters to a bowl and shred off the meat, fat and skin using a couple of forks. Put the shredded meat into a container - perhaps a parfait jar, or I used a loaf tin lined with clingfilm. Top up with the cooking liquor. Compost the left over veges.

7. Let the Trotter Gear cool. It can then be stored in the fridge for a week or so, or you could do as I did and split it up into convenient sizes and pop into the freezer.

Mine was a bit more wobbly than Fergus's and not quite as photogenic!

I will be trying out some recipes using Trotter Gear as an ingredient very soon...in the meantime I am off on holiday for a week or so, learning to make chocolate wedding cakes. I'm sure the results will either be on here or on Cake Wrecks in the coming weeks!

Enjoy!

The Princess

Sunday, September 14, 2008

Ludlow food festival 2008

I got up at a ridiculous time yesterday and made the 170 mile journey to Ludlow for the annual food festival. With 130 stalls, tastings galore and numerous other activities going on over the long weekend, it is a mecca for foodies all over the UK.

Highlight of the day was definitely the sausage trail - we tasted five sausages from different butchers scattered around the town square and rated them all out of ten. My favourite was a deliciously subtle pork, mustard and tarragon number from D W Wall & Son. We got to the end of the trail only to find that our reward for handing in our form was yet another sausage! We then had to sit down and have a rest...

We recovered in the sunshine with some butterscotch crunch ice cream from September Organics - sheer heaven in a tub! They also make some other interesting flavours like brown bread, blackberry & apple crumble and honey & ginger. Luckily they do mail order and are also stocked down South in Fresh & Wild.

Once we could eat no more, we spectated at the Waiters' Race. Six plucky waiters dashed around the square, collecting glasses of water from each of six pubs and racing back to the start with the drinks (hopefully) intact. There were some impressive performances, especially considering how busy the square was.
Waiter racing

Waiter2

Waiter3

Sunday, September 7, 2008

Moist plum cake with vanilla ripple

It's been a horrible, wet weekend in Surrey so there was only one thing to do - stay in and bake! I found this recipe on one of those free cards you get in the supermarket. I substituted yellow plums, although you could easily use the red variety, greengages or various other fruit (raspberries might go nicely).

Moist Plum Cake with Vanilla Ripple - makes 10 large pieces

400g plums, chopped roughly
200g self raising flour
175g unsalted butter
175g dark muscovado sugar
3 tbsp caster sugar
4 eggs
1 tsp vanilla extract
200g cream cheese

1. Preheat the oven to 180c (gas 4). Grease and line a shallow baking tray with baking parchment. The parchment must come up above the sides of the tin to contain all the mixture.

2. In a bowl, beat the cream cheese with a wooden spoon until soft. Add the vanilla extract, caster sugar, one egg and beat until smooth. Mine separated slightly but it didn't seem to affect the end result.

3. In the KitchenAid, beat the butter, 3 remaining eggs, muscovado sugar and flour for a couple of minutes until creamy and pale brown.

4. Spread the creamed muscovado mixture into the lined pan. Swirl the cream cheese mixture on top and then sprinkle with the chopped plums.

5. Bake for 45 minutes until the cake is slightly firm and springy to the touch. Leave to cool in the tin.

The cake tastes great served hot or cold. It should be deliciously moist, with the creamy swirls of sweet cream cheese providing an instant-custard effect. Or you could just serve it with more custard...

Enjoy!

The Princess